

Tuesday, February 28, 2012
Simprop: new items 2012
Following Nüremberg toy fair last month, I missed the new items catalogue from Simprop. Here it is: Simprop 2012.
Monday, February 27, 2012
VTPR: Stiction 1.7

On his side, Eric Johnson continues to explore his interresting concept of PSP with the Stiction, wich differs from the Zeppelin just by a different fuselage profile. One thing Eric learned on the Stiction is that by using the New Stuff plastic laminating film on the wing and surfaces, he noticed that the energy retention is a better..
Video: VTPR california style
Moving virtually from LA (Oscar ceremony) to Santa Barbara :), here is a very nice video from Steve Lange about VTPR:
Tribute to "The Artist"
After the crazy night at the Oscar Ceremony where the french movie "The Artist" won 5 trophies, including best actor, best film, best film director, here is my tribute as an allusion to this film.
Wednesday, February 22, 2012
Willow build log #2
The preparation and installation of the servos tray is probably the operation of the assembly that needs the more attention.

Stay tuned !
First of all, I cut a notch on each side of the inner nose in order for the tray to be blocked in position. I liked this way to do, nice design !
The plywood tray is cut to perfectly fit the inner nose, and host the ballast tube. But holes for the servos, receiver and battery are not cut, which I like because you can optimize the layout depending of the servos you use.
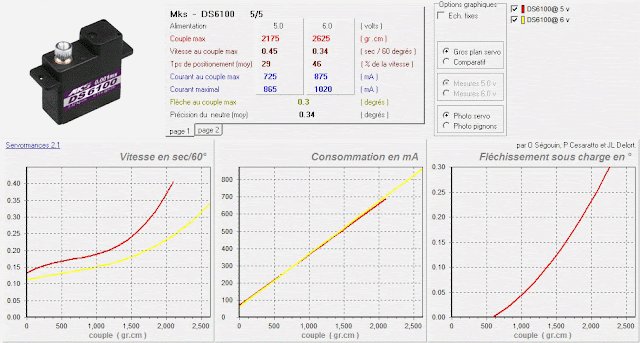
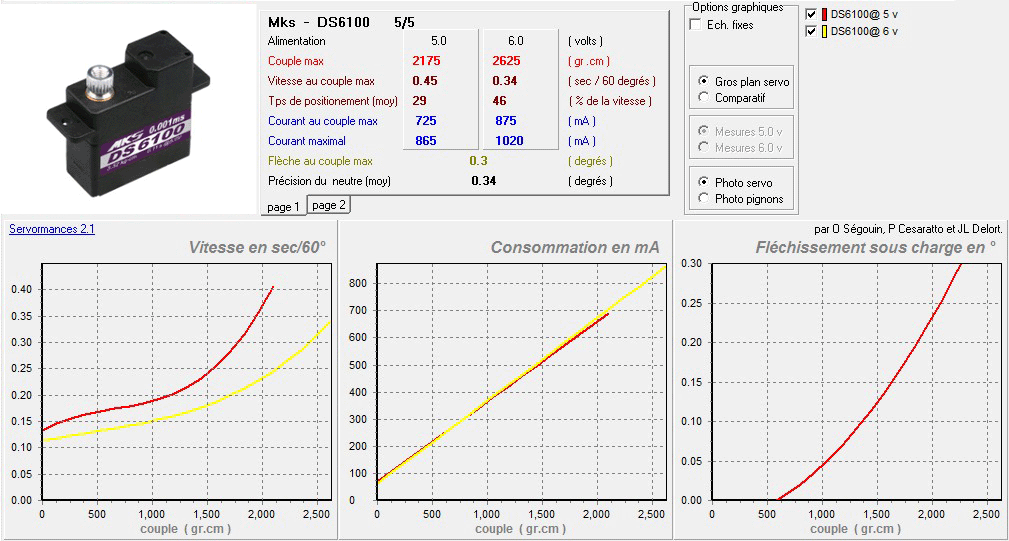
For the elevator, I decided to use the excellent and tiny MKS DS6100 servos which is very powerful for it's size, perfect for a V-tail of a F3X plane.
I also cut the holes for the Jeti R8 receiver and a battery that could be in my case 4x eneloop cells (AA size).
The tray is reinforced here and there with a piece o additional plywood.
The servos tray is then glued in place, using 10 minutes epoxy, and after sanding the inner nose surface to maximize the fixing. Once dry, I used a layer of 163g/m2 fiberglass and some carbon rowing on each side of the tray, with epoxy resin, to make the fixing of the tray nearly undestructible.
Then come the installation of the ballast tube. This stage needs attention in order to position it perfectly to avoid the CG to move when ballasting. The dimension of the ballast tube depends on:
location of the CG: I choose 103mm
The distance between the CG and the front end of the tube, considering that the last slug is to close an secure the ballast.
If necessary, cut the tube a bit, then, whit the mini drill, open the front end to ease the extraction of the slugs. I have chosen to secure the ballat with a bolt, so I installed a nut below the ballast tube, in a small block of samba wood. I encourage you several dry assembly of th tube and the inner nose to check that everything fit well, that the rear end of the ballast tube is in contact with the bottom of the fuselage, once in place.

If everything is fine, then you can fix the ballast tube on the servos tray. I did it in 2 steps: First with some 10 mn epoxy, then later with some black Sikaflex 11FC+ which is a elastic joint sealant and multipurpose adhesive based on polyurethane, not silicone.
The sealant is pretty strong, even if it remains flexible with time. Some modellers use it to glue servos in the wings. I usually don't do it because the fixing is so strong that you cna damage the wing if you want to rmove the servos from the wing. But for a ballast tube that will contain about 1kg of ballast, this sealant is perfect.
Next time, I will glue the inner nose + servos tray + ballast tube in place, and start the servos installation in the wings.
Stay tuned !
Monday, February 20, 2012
Willow build log #1

I started the assembly of the willow, with only one hand as I received a surgery on the left hand 10 days ago. Not that easy ! I began with the wiring harmness for the wings and the fuselage. Servos connectors are crimped. I now do this for few years since I bought a crimper at the local shop. It give good result and avoid to multiply the soldering points with extension leads. At the other end, I used MPX like green connectors. They are soldered, protected with heat shrink tubes, then secured with hot glue (standard). I really encourage everybody to do this even if the connector is then glued in place, the hot glue can removed in case of problem and, unlike silicon, doesn't chimically attack the wire or the plastic. It secures greatly the soldering mechanically. I do this for 15 years and had no bad experience.
Friday, February 17, 2012
Team Black Sheep Video: Death Valley
TBS (Team black sheep) is currently doing a road trip in the west of USA. They have already released few videos, but the most spectacular one is the video filmed in the death valley.
These guys are really good. I pretty like the video editing, with a mix of onboard video and sequences filmed from the ground.
Zepsus Magnetic Switch

Zepsus is a newcomer on the market, and proposes its magnetic switch mainly designed for F3X sailplanes. The main characeristics of this switch is that it is very tiny as you can see on the pictures. It will be very easy to install it, even in a narrow F3X fuselage. Its weight is about 3g, which is negligeable. The other interresting feature of this switch is that it is given for 7A constant, which is more than enough for a 6 servos sailplanes.
Construction of this switch is very good, enterely in surface mounted components, on a single side circuit plate. Soldering is nicely done. It comes with JR type connectors on both side (male/femelle) with 0.5mm2 wires, about 18cm long.
Like all electronic switches, the Zepsus magnetic switch has an extra low leak current when Off. No danger to let it plugged for a long time. Input voltage range is from 3V to 13V, which means that you can use it with only one Lipo cell battery like in some F3K sailplane. Please note that this is not a regulator, so remain cautious when going above 6V as some servos/receivers doesn't like it !
The Zepsus magnetic switch is delivered with a small magnet that you will necessarely loose very quickly if you don't secure it one way or another immediately. With the magnet provided, the simplest solution is to use a wood pin ( you certainly have this in your tool box !) that you drill at the rigth diameter at one end. Then you glue the magnet into it. It also work with a rawlplug.

I'm proposing you another alternative, using a socket head bold. On the head you glue a round and flat magnet of the right dimension, then you finish with some heat schrink tube around. I advise you to prepare several of them and put one or 2 in your radio bag/case to not into the situation where you arrive at the slope with exceptionnal conditions, but you forgot/lost the magnet !!! I admit that this is the only drawback of magnetic switches in general...
Anyway, Zepsus magnetic switch works pretty well. I played several hours with it. It is sensitive enough for usual installation into the fuselage. From what I read on various forum, it is used around the world, and feedbacks are very positives.
Technical Data:
- Input voltage range: 3v to 13v
- Output current constant: 7A
- Output current burst: > 20A
- Ultra low stand-by current: 5µA (micro-ampere)
- Connectors: JR-type
- Weight including cables: 3.7 grams / 0.13oz.
- Dimensions: 25 x 8 x 5 mm / 0.98 x 0.31 x 0.20 in
- Length including cables: 18 cm / 7 in
- Operational temperature range: -10C to +50C
- Manufacturer: Zepsus
Wednesday, February 15, 2012
Willow F3F, a budget friendly F3F sailplane

Designed by Ian Mason, manufactured in China, and distributed by G-Fly for France, Germany, and Italy, the Willow intends to be a budget friendly sailplane for F3F and sport flying (from 670 €).
 |
| http://www.g-fly.it/alianti/willow-f3f.html |
There is no secret to keep the cost down. It starts during design phase by doing some trades off. Therefore there is nothing revolutionnary, only proven solutions. The section is derived from the RG15, the planform is inspired by the Race M, which was and still is a competitive plane. The Willow is rather compact with its 2.75m wingspan. The fuselage is large enough to host standard servos. The V-tail is in one piece, which simplify the manufacturing ( no joiner, no tube needed).
On the manufacturing side, the cost reduction comes from the following compromises:
- Moulds are made from hand made masters
- Manufacturing is done in China, with quality control from Ian. Several iterations have been done on the layup to reach the right stiffness and quality
- More work remains to do during the assembly as will see later
I always look first at the wings, as it is the main component. Willow wings are nicely made, with a clean finish. The version I have is the D-box carbon which means this is a glass version with a extra carbon layer in the inner wing, going from the leading edge to the spar. This means that you don't see the carbon clothes, but you feel it as the wing skin is strong under pressure. The spar is using carbon socks as we can see from the servos holes. The servos bay is reinforced with an extra layer of carbon, to avoid deformation when installing the servos. Brass horns (much better than cheap horns made from epoxy plate) are in place, and "epoxy/micro" wipers are nicely made along the wing. Clevice exits are already drilled, wich is a good point as I hate to do it usually.
The fuselage is full fiberglass, the absence of carbon reinforcement is compensated by the diameter of the boom. No worries, it is 2.4 Ghz friendly ! The fuselage arrives in 3 parts. The rear part, with a sort of Bowden Cable System in place for the elevator that is working smoothly, the inner nose, and the nose cone.
The tailplane, in one part, which is screwed on the top of the fuselage with 1x 3mm and 1x 2mm screws. Epoxy/micro wipers are done on the tail. Remains to do the builbing and installation of the elevator control horns. Then you find in the kit the carbon joiner (section 20mm x 12mm, 6° dihedral), a long servos tray in plywood, a ballast tube, and a small plastic pocket with the servos covers, the clevices, the ball clevices for the tail, and 4 couplers for the elevator contol rods. in option it is possible to buy a 3° dihedral joiner.
Overall quality is fine. The finish is clean and the fit of the different parts together is good, which gives to this Willow a good ratio quality/price.
Here are the weight of each element:
- Left wing: 660gr
- Right wing: 648gr
- Tailplane: 95g
- Fuselage (including the inner nose): 413g
- Joiner: 59g
- Total: 1875g
What is missing is the assembly manual, but this should be resolved soon by a online manual. In any case I will provide plenty of information during the building, so you just need to follow my assembly log.
Stay tuned !
Video: F3F winter practice at "Piko Del Fraile"
This nice video, posted by our spanish friends shows Inaki Elizondo practising F3F at the "Piko del Fraile" by -4°, but I imagine that, with the wind, it is much less !
This spectacular slope is near Vitoria and hosted the Spanish Championship last year, but it was in July !!!

Saturday, February 11, 2012

Friday, February 10, 2012
E-Rotmilan ready !
I finally finished my Electro Rotmilan. I encountered few issues during the assembly: the length of the axis of the motor was 8mm too long for the spinner provided. as the spinner couldn't be modified, and tha I did'nt want to cut the axis, I cut a wood plate at the exact dimension. result is perfect. Then I had to change 3 time the battery, each time a little bit too big to enter freely in the fuselage. I ended with a Hyperion G3 45C, 3S, 1900mAh.
Last small issue, the receiver being behind the battery, and not accessible, I had to make an extension lead for the ESC to be able to unplug it easily and connect it on the USB cable to program it or to use the built-in logger. Finally, I used 2 antenna exits to install the 2.4Ghz antennas in the best position.
The plane is well balance without any lead (yeeessssss !) and the weight is just 2.5 kg, which is better than expected initially.
The Rotmilan is ready to fly now, waiting for better weather condition. Here are the pictures taken during the assembly.
Monday, February 6, 2012
Slideshow: Nüremberg 2012
 |
And as introduction, here is a short video from my friend Zhen with his multicopter while arriving to the exhibition:
Enjoy the slideshow, and a big thanks to Flash-RC.com for their contribution !
Friday, February 3, 2012
Video: Winter flight over the cloud sea
This nice video, taken end of December by Julien Benoit, is filmed from a Nan Model Shadow with a GoPro onboard.
Wednesday, February 1, 2012


Subscribe to:
Posts (Atom)
Jehnedi (CZ) F3G Eurotour final contest report
Text and photos: Sebastian Haase (German version below) In my last and first report on the new, young and upcoming FAI class F3G, Pierre an...

-
 More information here A thumbs version will be available in september 2011 : DC-16 main features: HARDWARE: - Magnesium body - 3,...
 -
 In fact we cannot really talk about assembly as it takes 25 minutes to have it ready, no glue is needed. This is faster than some RTF ki...
 -
 by Yannick Selles and Pierre Rondel Introduction The purpose of this article is to propose you to "build" your own Blu...